Cuello infinito Möbius
El cuello Möbius debe su nombre al matemático y astrónomo alemán August Ferdinand Möbius, descubridor de La banda que lleva su nombre. Demostró que existen superficies formadas por una sola cara tomando una larga tira rectangular de papel y uniendo sus extremos después de darle media vuelta. Eso exactamente es lo que vamos a hacer “Matemática aplicada”.
The cowl Möbius owes its name to the mathematician and German astronomer August Ferdinand Möbius, discoverer of the band which takes its name. He demonstrated that there exists a surface formed by a single face by taking a long rectangular strip of paper and joining its ends after giving it one twist. This is exactly what we are going to do “Applied mathematics “.

TUTORIAL PARA UN CUELLO DE 60 cm DE CONTORNO Y 30 cm DE ALTO / COWL TUTORIAL 60 cm CONTOUR AND 30 cm HIGH
GRADO DE DIFICULTAD
Medio
MATERIALES
1 ovillo de 100 gr de lana para tejer con una aguja del número 5
Aguja utilizada número 7
PUNTOS DE CROCHET UTILIZADOS
Cadeneta (c.a.d.)
Punto corredizo (p.c.)
Punto medio (p.m.)
Margarita de 3 pétalos
DIFFICULTY
Medium
MATERIALS
1 ball of wool of 100 gr to work with hook number 5
Hook used n º 7
CROCHET STITCHES
Chain (ch)
Slip Stitch (sl st)
Half double crochet (hdc)
3 spike star (daisy) stitch
DESCRIPCIÓN DEL PUNTO MARGARITA DE 3 PÉTALOS / STAR STITCH DESCRIPTION
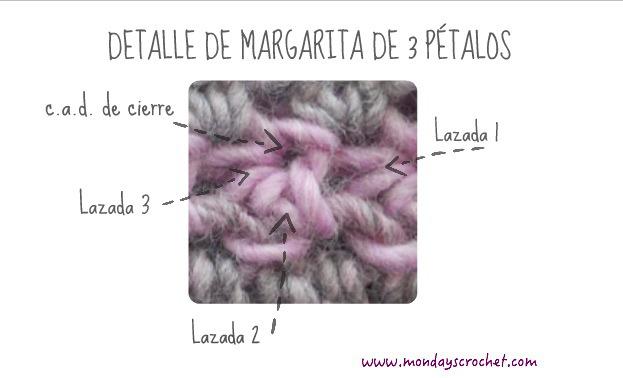
Tejer 3 c.a.d. de subida, el primer pétalo o lazada se hará en la 2ª c.a.d. El segundo pétalo o lazada en la base de la c.a.d. Para tejer el tercer pétalo saltaremos un punto de la vuelta anterior y haremos la lazada en el siguiente. Cerraremos las tres lazadas con 1 c.a.d. de cierre. Tenemos así 1 margarita de 3 pétalos. La siguiente margarita tiene su primer pétalo en la c.a.d. de cierre de la margarita anterior, el segundo en la base del tercer pétalo y el tercero saltando un punto de la vuelta anterior. Cerrar con 1 c.a.d. para formar la segunda margarita.
Make 3 ch to start the row, make the first spike in the second ch from the hook. The second spike in the base of the ch. To make the third spike skip one stitch and make the next loop. Pull through all three loops. Now we have a 3 spikes star. The next star has the first spike in the ch of the previous star, The second one in the base of the third spikes of the previous star and the third one skipping a stitch of the previous row. Finish off with a ch to make the second star.
Este punto de racimos tiene varias variedades; dependiendo del número de lazadas que empleemos, será de 3, 4 o 5 pétalos.
This stitch has some variations depending on the number of loops that are used, 3, 4 or 5 spikes.
Nosotras hemos elegido la composición formada por la repetición de las siguientes vueltas: puntos medios, margaritas de 3 pétalos y 2 puntos medios tejidos juntos. También Son muy apropiados los dibujos de conchas o aquellos cuyos gráficos permitan al cuello un bonito acabado.
We have chosen the composition formed by the repetition of the following rows: half double crochet, 3 spikes star and 2 half double crochet together. We can also use shell stitch or those that allow a nice finish.
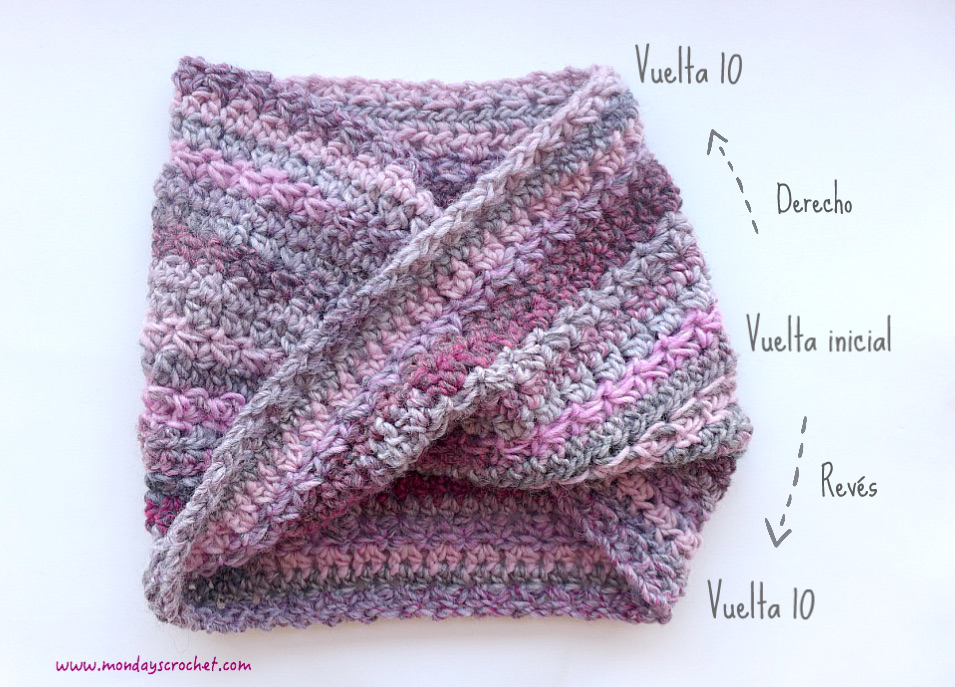
El cuello mobius es un 8 infinito muy divertido de tejer. Para conseguir este efecto os vamos a enseñar una pequeña genialidad que permite, mediante un giro en el tejido, tejer hacía arriba y hacia abajo, por el derecho y el revés, sin que nos demos cuenta.
The mobius cowl is an infinite 8 and is very entertaining to make. To obtain this effect we are going to teach you a brilliant idea with a twist, to crochet upwards and downwards without realizing.
CÓMO SE HACE EL CUELLO MÖBIUS / HOW TO MAKE MOBIUS COWL
Para que un cuello pase de ser circular a infinito simplemente haremos un sencillo giro en el tejido. Para ello:
Tejemos una cadeneta base inicial de 66 c.a.d.
En la siguiente vuelta hacemos 2 c.a.d. de subida y tejemos 65 p.m.
Terminados los p.m. damos un giro al inicio de la VUELTA DE GIRO y seguimos tejiendo sobre la c.a.d. base inicial (marcador morado).
Rematamos el inicio de la labor a la c.a.d. de subida de la VUELTA DE GIRO (marcador verde).
Ahora podemos seguir tejiendo de la forma habitual. Hemos hecho el giro Möbius.
In order that the cowl changes from circular to infinite make one twist in the foundation ch.
Chain 66.
In the next row make 2 ch to start the row and make 65 hdc.
Before joining the last hdc twist the foundation chain and keep working in the chain (purple marker).
At this point fasten off at the top of the hdc of the first row (green marker).
Now we can keep working normally, the möbius twist is done.
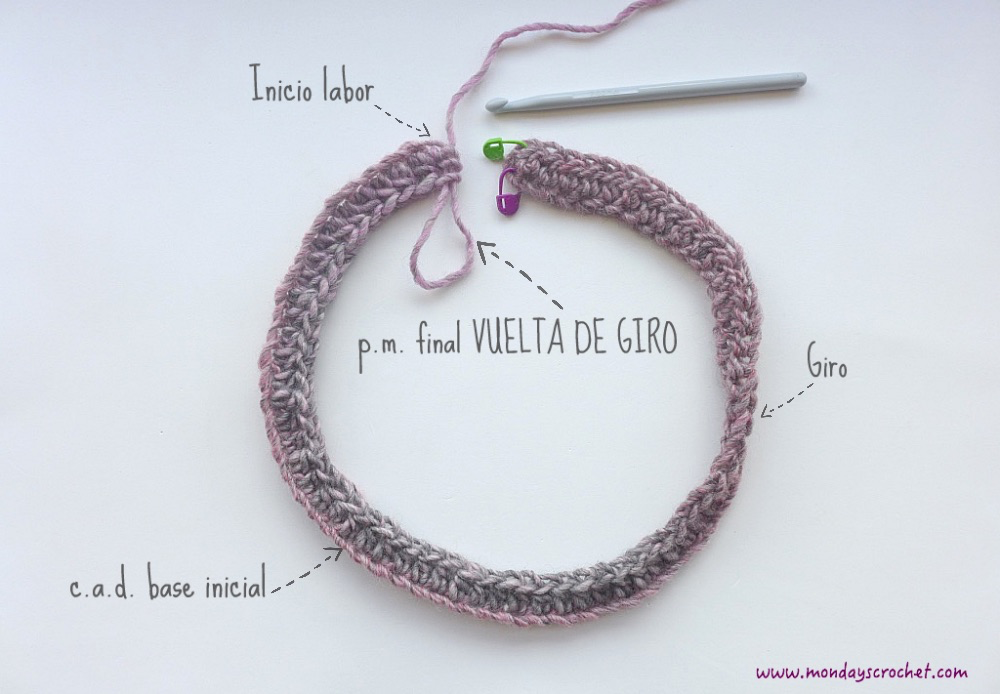
VUELTA INICIAL: Tejer 66 cadenetas.
VUELTA DE GIRO: Tejer 2 c.a.d. de subida que cuentan cómo un p.m. y 1 p.m. en cada c.a.d. base. En total 66 p.m. Tejer un p.c. a la c.a.d. base de inicio de la labor (marcador morado).
Rematar el hilo del comienzo de la labor con la c.a.d. de subida de la VUELTA DE GIRO o primer p.m. (marcador verde).
STARTING ROW. : Make 66 ch.
TWIST ROW : 2 ch to star the row, they count as the first hdc and 1 hdc in each of the ch stitches, 66 hdc in total. Finish off with a sp st in the initial ch making a möbius twist (purple marker).
Fasten off at the top of the last ch of the twist row (green marker).
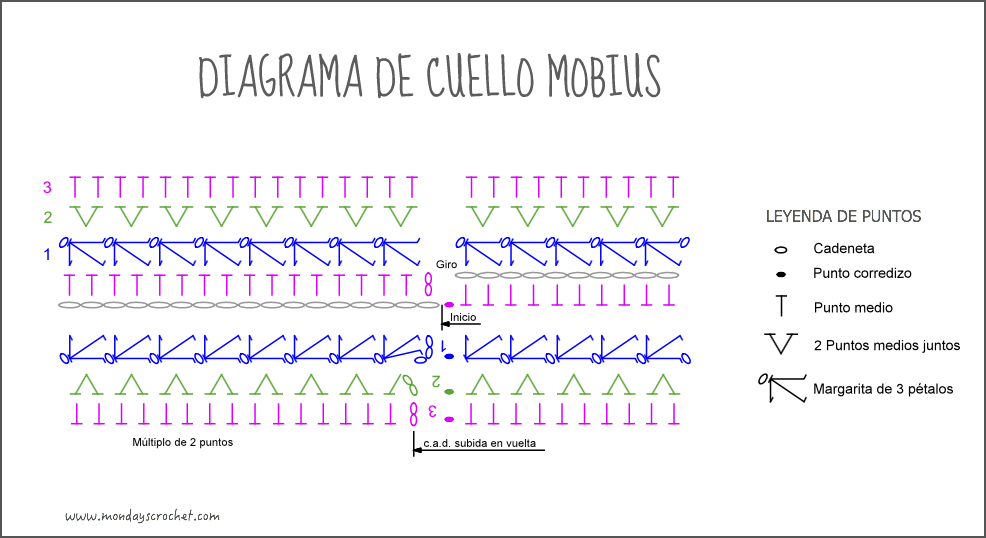
VUELTA 1. MARGARITAS DE 3 PÉTALOS: Esta vuelta se teje primero sobre la c.a.d. base de inicio y luego, sin apenas darnos cuenta, sobre los p.m. de la VUELTA DE GIRO. Tejemos 3 c.a.d. de subida, margarita de 3 pétalos: la primera lazada en la 2ª c.a.d de subida, la segunda lazada en la base de la c.a.d. de subida y la tercera lazada salto 1 punto de la vuelta anterior y cierro con una c.a.d. las 4 hebras. La siguiente margarita tiene su primer pétalo en la c.a.d. de cierre de la margarita anterior, el segundo en la base de la tercera lazada de la margarita anterior y saltando 1 p.m. de la vuelta anterior hacemos otra lazada. Cerramos con 1 c.a.d. Repetir. Cerrar con 1 p.c. a la c.a.d. de subida de la primera margarita.
VUELTA 2. “V” 2 PUNTOS MEDIOS TEJIDOS JUNTOS: 2 c.a.d. de subida y 1 p.m. en el primer pétalo de la margarita. 2 p.m. juntos en el primer pétalo de la siguiente margarita. Repetir. Cerrar con 1 p.c. a la c.a.d. de subida. Se puede hacer este punto sobre el centro de la margarita de la vuelta anterior y la “V” quedará más cerrada.
VUELTA 3. PUNTOS MEDIOS: 2 c.a.d. de subida. 1 p.m. en cada p.m. de la vuelta anterior. Cerrar con 1 p.c. a la c.a.d. de subida. Tejer el primer punto junto a la c.a.d. de subida y no tejer el último. Así evitaremos aumentar puntos en esta vuelta.
VUELTAS 4-7-10: Tejer igual a la vuelta 1.
VUELTAS 5-8: Tejer igual a la vuelta 2.
VUELTA 6: Tejer igual a vuelta 3.
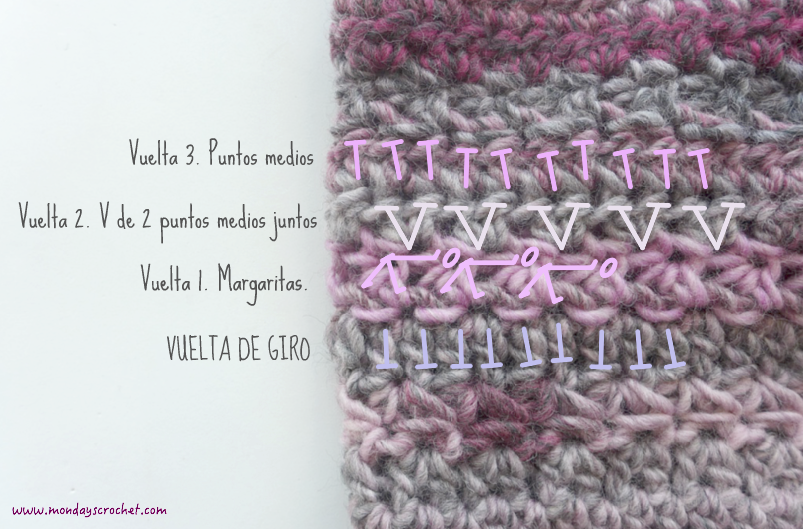
ROW 1. 3 SPIKES STARS: Make 3 ch in the first spike in the second ch from the hook. The second spike in the base of the ch. To make the third spike skip one stitch and make the next loop. Pull through all three loops. Now we have a 3 spikes star. The next star has the first spike in the ch of the previous star, The second one in the base of the third spikes of the previous star and the third one skipping a stitch of the previous row. Finish off with a ch to make the second star.
ROW 2. “V” 2 HDC TOGETHER: 2 ch to start the row and 1hdc in the first spike of the star. 2 hdc together in the fist spike of the next star. Repeat. Finish off with a sl st. You can make this stitch in the center of the start of the previous row and the “V” will look closer.
ROW 3. HDC: 2 ch to start the row. 1 hdc in each hdc of the previous row. Finish off with sl st. Make the first stitch beside the first ch, do not make the last one to avoid increasing.
ROWS 4-7-10: Like row 1.
ROWS 5-8: Like row 2.
ROW 6: Like row 3.
Lo hemos pasado muy bien con esta técnica. Ponla en práctica. Te sorprenderá!!
We had a lot of fun with this technique. Put it into practice. You will be surprised!